Control Panel
This section describes the names and usage of the parts of the control panel.
![]()
The actual control panel may look different from the illustration below, depending on the country of use.

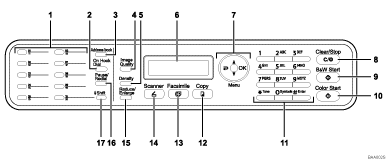
One Touch Buttons
Press to select a scan or fax destination using entries registered as Quick Dial in the Address Book.
[On Hook Dial] key (Type 2 and Type 3 models only)
Press to use on-hook dialing to check the destination's status when sending a fax.
[Address book] key
Press to specify destinations from the entries in the Address Book when sending a fax or scanned file.
[Image Quality] key
Press to select quality for scanning the original for the current job.
Copier mode: select Text, Photo, or Mixed.
Scanner mode: select the resolution.
Fax mode: select Standard, Fine, or Photo.
[Density] key
Press to adjust color tone for scanning the original for the current job.
Copier mode: select from 5 levels of density.
Scanner mode: select from 5 levels of density.
Fax mode: select from 3 levels of density.
Screen
Displays current status and messages.
Menu keys
Press any of these four keys to enter the menu for configuring the machine.
[
 ] key
] key Press to exit to the previous level of the menu tree.
[
 ][
][ ] keys
Press to scroll through the current level of the menu tree. When entering characters, press the [
 ] or [
 ] key to move the cursor left or right, respectively.
[OK] key
Press to confirm settings or enter the next level of the menu tree.
[Clear/Stop] key
While the machine is processing a job: press to cancel the current job.
While configuring the machine: press to cancel the current setting and return to standby mode.
While in standby mode: press to cancel temporary settings such as image density or resolution.
[B&W Start] key
Press to scan or copy in black and white, or start sending a fax.
[Color Start] key
Press to scan or copy in color.
Number keys
Use to enter numerical values when specifying settings such as fax numbers and copy quantities, or enter letters when specifying names.
[Copy] key
Press to switch to copier mode. The key stays lit while the machine is in copier mode.
[Facsimile] key (Type 2 and Type 3 models only)
Press to switch to fax mode. The key stays lit while the machine is in fax mode.
[Scanner] key
Press to switch to scanner mode. The key stays lit while the machine is in scanner mode.
[Reduce/Enlarge] key
Copier mode: press to specify the reduction or enlargement ratio for the current job.
Scanner mode: press to specify the scanning size according to the current original.
[Pause/Redial] key
Pause
Press to insert a pause in a fax number. The pause is indicated by “P”.
Redial
Press to display the last used scan or fax destination.
[Shift] key
Press if you want to use Quick Dial entries Nos. 11 to 20 when specifying a scan or fax destination.
![]()
The backlight of the screen is turned off when the machine is in Energy Saver mode.
When the machine is processing a job, you cannot enter the menu for configuring the machine even if you press a menu key. You can confirm the machine's status by checking messages on the screen. If you see messages such as “Printing”, “Copying”, or “Processing”, wait until the current job is finished.
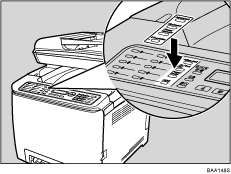
An overlay for the control panel may be included, depending on the country of use. If an overlay is included, apply the overlay that is appropriate for your language to the control panel.


